|
||||||
|
|

|
Device Configuration Guides
Configure Your Own Local Access Number with Trixbox
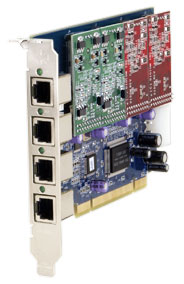
Note : Before you start using this configuration guide, make sure you have configured your Trixbox following our online configuration guide. You can easily configure your own InPhonex local access number using Trixbox. Your customers will call your local PSTN numbers which will be connected to a Digium PCI PSTN card and redirected to our local access number platform (8600). The card we recommend for this deployment is the Digium TDM400P card with four fxo ports. However, if you just want to configure your Trixbox server for testing or just personal use you can use the Wildcard X101P or X100P card with one fxo port.
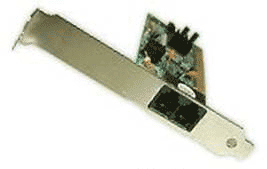
X101P or X100P Card Installation
To configure this card with Trixbox use the zaptel card auto-config utility to setup the zaptel driver.
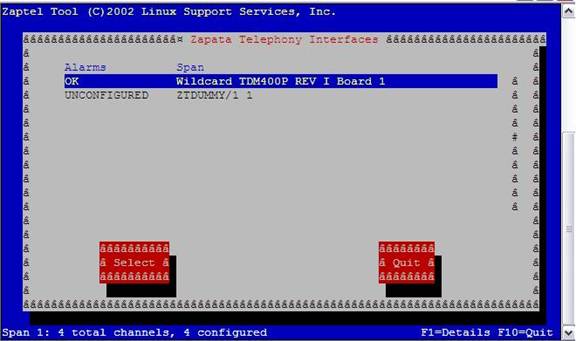
The results of zttool should show your zap card as configured. You can also run the command zap show channels:
asterisk1*CLI> zap show channels Chan Extension Context Language MusicOnHold pseudo from-pstn en 1 from-pstn en
If this information is shown, then the card has been configured correctly.
TDM400P Card Installation You can find additional documentation and specifications at: http://www.digium.com/en/products/hardware/tdm400p.php NOTE: Make sure to order the card with 4 fxo ports since they also have them with 2 fxo and 2 fxs ports. Start by installing the card into a free PCI slot. Make certain that you connect a power cable into the card. FXO cards require power in order to power the telephone line or extension. The TDM400P range of cards use the standard 4 pin hard drive power connector, if you don't have a free power connector you can always buy the equivalent of a double adaptor. Close the PC up and turn the power on. Note: the LED's adjacent to each port will not come on until the the device has been properly configured. In Trixbox you need to configure some options manually since the card will not work as soon as it is installed.
Logon to Centos and execute the following commands: [root@asterisk1]# cd /usr/src/kernels/2.6.9-34.EL-i686/include/linux [root@asterisk1]# mv spinlock.h spinlock.h.old [root@asterisk1]# wget http://nerdvittles.com/aah27/spinlock.h OR if that doesn't work..... [root@asterisk1]# wget http://liquid-fire.us/spinlock.h [root@asterisk1]# cd /etc/udev [root@asterisk1]# cp ./permissions.d/zaptel.permissions /usr/src/kernels/2.6.9-34.EL-i686/include/linux [root@asterisk1]# cp ./rules.d/zaptel.rules /usr/src/kernels/2.6.9-34.EL-i686/include/linux [root@asterisk1]# cd /usr/src/zaptel [root@asterisk1]# make linux26 && make install [root@asterisk1]# shutdown -r now if zaptel drivers have been identified after a reboot: [root@asterisk1]# genzaptelconf [root@asterisk1]# ztcfg [root@asterisk1]# zttool The results of zttool should show your zap card as configured
Edit Zapata-auto.conf file ( if you installed a X101P or X100P Card) Use a PC on your network that has a web browser and connect to your Trixbox using HTTP://YourTrixboxIPaddress
Edit Zapata-auto.conf file (If you installed a TDM400P card)
Edit extensions_custom.conf file
Note: This will redirect all calls answered by your Trixbox to InPhonex local access number platform assuming that you have already configured your Trixbox following our configuration guide.
For more tips on securing your Asterisk server, please visit these links: http://etel.wiki.oreilly.com/wiki/index.php/Asterisk_Brute_Force_Prevention http://www.voip-info.org/wiki/view/Fail2Ban+(with+iptables)+And+Asterisk
Notice regarding support: In an effort to provide the best possible support, we offer the following options to Trixbox/Asterisk users:
|
||||||||||||||||
|
Our Home Phone Service includes Internet phones with free Internet calling and unlimited US and Canada plans. We offer prepaid phone service and International DID numbers using our voice over IP system and an analog telephone adaptor (ATA). The solutions are designed for home phone service, business phone service, call shops, telemarketing firms and cyber cafes. InPhonex is proud to support Internet telephony equipment (IP Phones) including Sipura 2000, Sipura 3000, Cisco 186, Linksys PAP2 and other SIP phone adaptors. We also support Asterisk PBX, Trixbox and offer turn-key VoIP Reseller business opportunities to let entrepreneurs and businesses resell voice over Internet (VoIP) under their brand name. Copyright © InPhonex
|